How to safely pack your camera bag
Professional photographers and photography enthusiast alike have many things in common. The most prominent one is that they don’t take their photos from the comfort of their home. Mostly. So to get that perfect shot, you will need to be out and about. With how fragile the equipment can be, you really need to think carefully about how you pack your camera bag. To save you that trouble we decided to compile this article. Soon, you will be ready to take your lenses on your next adventure safely!
Pack your camera bag by the book
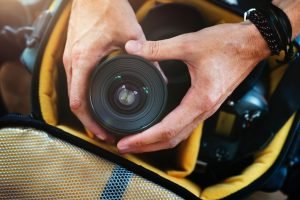
One of the simplest and safest ways to pack your camera bag is to do it by the book. Your first choice here would be a pre-made, specialized, camera bag that is lined with padding and has dividers included. These are designed to keep your camera, gear and lenses protected from scratches or damage. This is especially important if you will be carrying a large bag that someone else might be handling, like airport staff. Anyone who has done any flying will know that in these cases luggage can be tumbled, thrown or even mishandled! As such having a good protective bag will be vital, if you plan on taking a large camera bag with you on a trip.
Apart from taking your camera bag to the airport, another situation where someone else might be handling your gear is a relocation. In this situation, professional movers like moving company Washington Heights might even require you to carefully pack your camera bag, before even handling it. This is because they will be aware of just how expensive photography gear can. In fact, they may even refuse to handle your gear if they feel it isn’t well protected for the move! In these cases, you really need to go by the book and get a camera bag. It might also be smart to add more protective padding, like bubble wrap inside, for better protection.
Make your regular bag into a camera bag
On the other hand, if you can’t afford a professional camera bag, or you will be carrying your own camera bag, you can always use dividers to protect your gear. These come in many shapes and sizes and can really help you keep your gear protected in a move or when traveling. However, you should only convert your standard bag or backpack into a camera bag with a divider if you will be handling it yourself. As an exception to this rule, if you found good movers that you can trust, you might let them handle the bag themselves. However, in this situation, it would be smart to take the usual precautions of packing fragiles for a relocation too.
Another thing to keep in mind here is what kind of bag are you going to use. Just like packing a camera bag for professionals, you want to use as much padding here as possible. Leaving as little room as possible within the dividers is a good idea too. After all, as Chicago moving crews might tell you, whenever you pack anything fragile, you want it to move as little as possible within its container. Also, keep in mind how much protection the bag itself provides. If it’s a fabric bag, make sure it doesn’t bump into anything as the contents can get damaged from an external force.
General tips on how to pack your camera bag
Now that we have talked about the general ways you can pack your camera bag, be it a professional bag or a bag you converted with dividers, it’s time to dive into the specifics. After all, if you want to win the next National Geographic travel photo contest, you really must make sure you safely pack your camera bag.
If you are packing the camera with other items give it extra protection
Just like packing a flat-screen TV or any other electronics, you really want to avoid anything wet touching your camera. Therefore, if you want to use your camera bag to carry other items that might leak, make sure you water-proof your gear. First, use a plastic bag to wrap your individual pieces of gear. Then, wrap whatever you have that might leak in its own plastic bag. This way you have a double layer of protection, just in case.
Make sure everything either removed or tight
When moving any item with removable parts, it is smart to remove them. The same goes for packing a camera bag. Having detachable items during transport can make them lose or break them off. To avoid such damage, make sure you remove any detachable before packing your camera bag. This, however, does not apply to protective items such as a lens or battery covers. These you should keep on. Just make sure they are tightly attached.
Remove the battery
Another smart thing to do when you pack your camera bag is to remove the battery. The idea here is to avoid the unfortunate situation of your camera turning itself on in transit. Depending on the length of your trip, this may drain your battery by the time you notice. However, do keep the battery at hand. You never know when the perfect shot might come up. To lose it to rummaging through your camera bag for the battery would be most unfortunate.
Mark your bags
In this article, we keep talking about how to pack your camera bag for transport. However, there are people who will be bringing more than one camera bag on their trip. In those cases measure all of the bags you will be using and arrange the lenses so they fit in the compartments nicely. Don’t cram them too much, but don’t leave wiggle room either. Finally, you can use a contrasting sharpie to mark your bags. This will help you when unpacking and later packing again.
Pack your camera bag well!
There you have it. We hope this article helps you pack your camera bag in a way that will keep your gear safe and sound. Take your time packing and unpacking your gear and soon you will be taking amazing photos wherever you are!